Background Eraser Tool
Click, paste or drag and drop files to edit
Select an image file jpg, png, webp

Drag and drop
OR
How to use the background eraser tool
Upload an image
Use the form above to load an image. Click the 'Upload image' button, copy and paste or drag and drop an image into the uploader.
Erase background
Apply the background eraser tool by stroking in the image just outside the borders of object you want to keep.
Download or save
Export and download your edited image or save it to your account.
Learn More About
the Background Eraser Tool
On this page
1. About the Background Eraser Tool
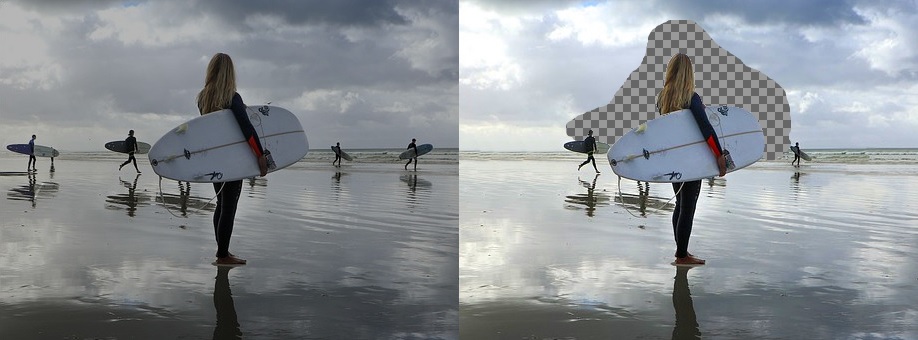
Quickly and easily cut out objects from the background of an image with the background eraser tool available in the free online image and photo editor on gifgit.com. The background eraser tool uses color difference to determine what to erase in an image. It is best used where the object or area you want to erase around or keep has a highly contrasting color with the background or adjacent color areas.
The background eraser tool is very effective for subject removal where the outline is irregular and selection with the lasso or marquee selection tools would be tedious and time consuming if not impossible. Upload a photo from your computer or use a sample image to try extracting with the background eraser tool.
2. Using the background eraser tool
- Upload an image using the form above.
- Brush around the object you wish to keep to erase the background around it. Make sure to sample a color that is different from the object or area you want to keep.
-
Adjust the settings in the tool options bar to control how pixels are erased when
you stroke with
the tool.
For example, if the area you try to erase is not fully cleared when stroked try
increasing the
tolerance to capture more pixels.
See the Tool Options section below to learn more about tool options. - When you have finished removing the background from your image download the image by using menu 'File' » 'Export Image'.
3. How it works
The background eraser is very similar to the brush and eraser tool. Like the eraser tool, the background eraser reduces the alpha value of the pixels in its stroke. Lowering the alpha value of a pixel makes it more transparent. At zero alpha value, the pixels become fully transparent. This process of reducing the alpha value of pixels to make them transparent is what we call 'erasing'. Unlike the regular eraser tool that blanket erases everything in its stroke, the background eraser tool is selective. It uses color similarity to decide what pixels to erase in the image. It compares the color of the pixels in its brush stroke to a set reference or sample color. If the difference between the pixel in the stroke and the sample color is within a user set similarity tolerance the pixel is erased, otherwise it is left unchanged.
3.1 Color sampling
How the sample color is set is determined by the 'Sampling' mode in the tool options
bar. The sampling mode
is important because it
controls how the background eraser tool erases when it strokes the image. To set the
sampling mode click to
open the 'Sampling'
dropdown in the options toolbar.

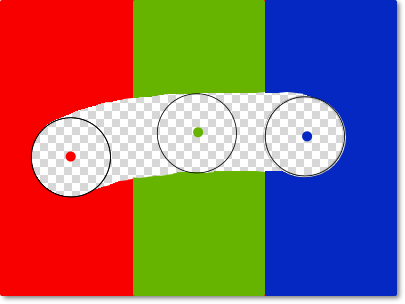
In Continuous Sampling mode the sample color is automatically updated as long as
you are dragging in
the image. Lets look at the example image below. If you start dragging in the red area
then
subsequently drag through the green then blue areas, the sample color will change to
green then blue based
on the color under the center of the brush as shown by the dots in the image below.
The green and blue areas in the background eraser stroke will be erased respectively
because the background
eraser is always updating its sample color to match the area it is in.
When erasing in continuous sampling mode you have to be careful to avoid drifting into
and erasing the
region you want to keep.
However, continuous sampling is particularly useful when there are variations in the
color of the area you
want to erase.
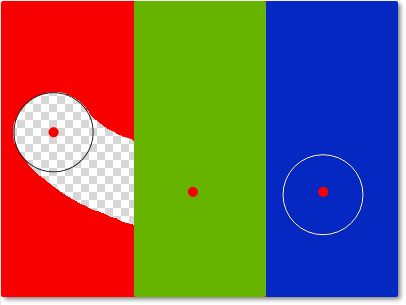
In Initial Sampling mode, the sample
color is set to the pixel color at the center of the brush when you press the mouse to
begin the stroke. The
sample color will remain constant as long as you keep dragging
the mouse. The image shows the result of stroking starting in the red area then dragging
through the green
then blue regions.
The sample color never changes which is shown below by the small red dots in the center
of the stroke.
The green and blue areas are not erased because the background eraser is only checking
against the initially
set red sample color.
The Background Color is the final sampling mode option. This mode sets the sample
color to the
background color swatch.
It is the only mode where the sample color is not changed when you use the mouse on the
image.
The sample color will only change when you change the background color.
Choosing the correct sampling mode goes a far way in getting acceptable results with the
background eraser
tool. You may need to do
test strokes to see how the eraser behaves in the area you want to remove. You can
always undo the action
then change the sampling mode to
see if you get a better result.
Tolerance
The Tolerance sets how similar a pixel color should be to the sample color for it to be erased in the eraser stroke. You enter the tolerance value in the tool option bar 'Tolernace' input field.
If the tolerance is set to zero (0%) or very low values only colors that are exactly the same or close to the sample color are erased. If set to 100% then all colors in the stroke will be erased like a regular eraser tool. Simply put, the higher the tolerance the farther in color a pixel can be from the sample color and still be erased.
To illustrate how tolerance affects the background eraser take a look at the image below. The first image is the unerased test image. It contains a set of concentric circles that change color from a slightly yellow green in the center to dark green in the outer ring. The white ring is the brush profile of the background eraser tool. The second image shows clicking in the image with a tolerance of 10%, the third a tolerance of 35% and the last 55%. As you can see the erased area in the stroke spreads to the darker green rings the more the tolerance is increased.
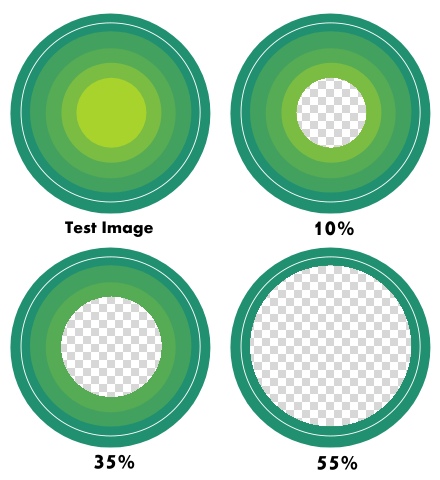
Getting the right tolerance to adequately erase the area you want can be an exercise in trial and error. You may have to work through several tolerance values and observe how the area is erased while you increase or decrease tolerance values.
3.2 Tolerance Settings
The Tolerance sets how similar a pixel color should be to the sample color for it
to be erased in the
eraser stroke. You enter the tolerance value in the tool option bar 'Tolernace' input
field.
If the tolerance is set to zero (0%) or very low values only colors that are exactly the
same
or close to the sample color are erased. If set to 100% then all colors in the stroke
will be erased like a
regular eraser tool.
Simply put, the higher the tolerance the farther in color a pixel can be from the sample
color and still be
erased.
To illustrate how tolerance affects the background eraser take a look at the image
below.
The first image is the unerased test image. It contains a set of concentric circles that
change color from a
slightly yellow green
in the center to dark green in the outer ring. The white ring is the brush profile of
the background eraser
tool. The second image shows clicking in the image with a tolerance of 10%,
the third a tolerance of 35% and the last 55%. As you can see the erased area in the
stroke spreads to the
darker green rings the more the tolerance is increased.
Getting the right tolerance to adequately erase the area you want can be an exercise in
trial and error.
You may have to work through several tolerance values and observe how the area is erased
while you increase
or decrease tolerance values.
4. When to use the background eraser tool
Use the background eraser tool in an image where the subject you are erasing around is distinct from the background and the background has a relatively uniform color or texture. Contrasting colors between the subject and the background helps the tool work effectively. The tool works best when there is a relatively clear distinction between the subject and the background, allowing for precise background removal without affecting the subject.
5. Background Eraser Tool Options
-
Size:
Sets the diameter of the brush strokes for the background eraser tool. Use small brush sizes to erase narrow areas of color and prevent spilling over into unwanted areas. Use large brush sizes when you do not need fine control and you want to erase large areas. -
Tolerance:
Sets the acceptable color difference between the sample color and the pixels that are covered by the background eraser brush stroke. Pixels with a color difference that fall within the set tolerance are erased. The lower you set the tolerance the closer a pixel color has to be to the sampled color to be erased. -
Sampling:
Determines the color sampling mode of the background eraser tool. There are two modes:-
Continuous:
Samples color as long as the user is pressing and stroking in the image. This means the sampled color will continuously be updated to the pixel that is in the center of the brush. -
Initial:
Samples pixel color when the image is pressed. The sampled color will remain constant throughout the of the brush stroke.
-
Continuous:
